Saturday 14 May 2016

Another Dimension: Animation Skills

I did not manage to finish animating moon, and submitted a crappy version of it that I made without even referring to the tutorial video. So, I decided to give it another shot after the deadline, and do it properly this time. The process takes time, but I felt really satisfied when I managed to follow the tutorial and got it right.

Before animating, it is important to set up the scene by creating a plane underneath Moom as a ground reference. And, import a picture of the walk cycle into the scene by creating a Free Image Plane, and place the image from its attribute. Later on, I figured that Matt did it differently. In his method, he creates a plane, scales it according to the dimension of the image reference, creates a new lambert, presses the checkered box beside the colour setting to open the source image file, and freeze transformation. 

The next thing to do is to change the settings: set the frame rate accordingly, the default in tangent to 'linear' and default out tangent to 'stepped' under the Animation setting for a pose-to-pose animation, the playback time to real-time in the Time Slider setting.

Also, I need to make sure that Maya is in custom mode so that I can set keyframes on Moom. To set Moom, simply marquee select him, go to create, set, add to shelf. Now, I can set a keyframe by pressing 'S' on the keyboard once I am done adjusting Moom's position.

When animating a rigged character in Maya, it is important to take note that the feet are inverse kinematic manner, such that if I move one of its foot the joints will follow. Meanwhile, the arms are forward kinematic, such that when I move the shoulder, the rest of the joints will follow in a parent-child manner. 

I started by moving Moom to the first contact position, set a keyframe in frame 1 as well as frame 25 since I am animating a repeated cycle. Then, I set another keyframe on frame 13. Since the position in frame 13 is the opposite to the first contact position, I have to screenshot or make a note of the joints transformation as a reference when I am moving each of them to their respective new positions.  

After that, I blocked out the first few keyframes before frame 13, copied them to fill up the rest. From frame 13 onwards, the keyframes will have the switched position of those keyframes before frame 13. To do so, press the middle mouse button while on, let's say, frame 4 and drag it to frame 16 so that Moom's position does not change, and from there we can repeat the process of switching Moom's position by referring to the screenshots of the transformation window.

Setup
Some of the Playblast from various angle. I Playblast-ed the animation into an image sequence and make them as looping GIFs on Photoshop.  


Friday 6 May 2016

Another Dimension: Modelling Skills

We've been learning how to use Maya this term, and I had a love hate relationship with the software. Initially, I'm not really fond of the software because there is so much tool to use. Fortunately, I had a solid understanding on manipulating basic shapes to make an object through my experience working with Google Sketch Up, although its feature is quite limited.

The first session of Maya Induction went really quick that I can't grasp most of it, so I became disinterested with the software. I started familiarising myself why the complex interface during the Spring break and made my first Maya model, the truck! Matt's video tutorial helped me learn some shortcuts and basic tools used in Maya. I'm still confused with how the snapping works and the truck seems to be detached from the trailer as I tried to move them around. 


For the second task, 'Do It Yourself', I made a maracas. I forgot to screenshot the process so I will just briefly describe what I did to make it. I started by making a cube, scaled it up, and extended it to make a big block. And, I added 7 edge loops to the block using Insert Edge Loop Tool (under Mesh Tool). While in side view, I used the marquee selection tool, to select some of the edges and manipulate it to get the shape that I wanted.

To add a texture on an object, select the object, right click and click 'assign new material' and make a new Lambert. Change the name of it, and open the UV Texture Editor to get a mat of the cube. Save the mat on the image folder of the project and load it to photoshop to apply the texture on the mat. Load the texture on Maya by clicking the checkered square beside colour adjustment bar and type out the file location.


A Tale in the Stings: E4 Ident Dance Sequence

I found a YouTube video of a scene when John Travolta is disco dancing and drew out some keyframes out of it to apply it on my final animation. Initially, I tried to draw some stick figures of Travolta, but I can hardly tell how the joints are twisted because they look 2 dimensional. So, I decided to take a different approach by drawing solid figure instead. 


Wednesday 4 May 2016

A Tale in the Stings: E4 Ident Zombie Walk

A walk cycle for the zombies that I came up with after watching some zombie films. I'm planning to use it for the action scene when the robot dances while shooting the walking zombies. It might be a little bit tedious to animate two characters at once, but I'm sure that it will make the action scene more interesting.


A Tale in the Stings: E4 Ident Mis-en-Scene

I researched the Disco culture from the 80s to get inspirations before developing the set for my animation. Instead of asking people around to dance for me, I checked out Saturday Night Fever, which is a disco films popular at that time, to take some of the dance moves that John Travolta does in the film.  


A friend of mine also recommended an obscure 30 minutes independent film titled Kung Fury. Although it is not disco related, it made me learn about the fluorescent colour palette used in retro films, an incorporate that to the final design of my set. The film emphasises on the tackiness of the 80s culture with badly done special effects which ironically gave aesthetic to the film. I found this interesting, and I might incorporate this to the mis-en-scene of the ident.


I also considered some disco artists that I'll look up when I'm looking at sound for the animation during the post production stage such as The Beegees, Giorgio Moroder, and Lipps Inc. 

Final set design for my ident:

I started by creating flat tiles for the dance floor. I thought that it will be great to make flickering dance floor and shining disco ball, but I might only do it if I have some time left after I'm done with animating the main actions. 


I've put all of the characters and effects together in one scene to see how they come together. I like how the scene turns out. Applying fluorescent colour to the zombie while making the colour of the robot more neutral gives a nice contrast between the foreground and the background.


A Tale in the Stings: E4 Refined Storyboard

Over the Spring Break, I decided to amend the storyboard so that it will involve less character movements. So, I did this quick sketches of what is going to happen in the animation. I still cut down some of the scenes from this refined storyboard like the retracting of the robot's hand since it might takes up most of the running time of the animation. The best possible solution is to work on fitting in the robot dancing and the blood splattering scene in 10 seconds. I am still not sure about making the robot dancing up to this point because no single person who I asked to dance is keen to do it. 


A Tale in the Stings: E4 Ident Storyboard

A simple storyboard that I made for the ident I presented during the critic session. I like the storyboarded version of my idea because it looks pretty chaotic, and involves rapid movements. On the other hand, I felt overwhelmed by work, and doubt that I can finish such elaborate animation on time. Matt also raised up the same concern as he saw the storyboard of my E4 ident. He suggested to cut down some things so that I don't make the same mistake as my 'The Other Side' animation which I did not managed to finish and consist of some scenes that is not timed properly. I will look at this issue, and address it in the final product. 

A Tale in the Stings: E4 Ident Concept Design

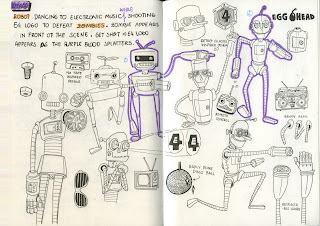
The main character in the ident will be a robot who disco dances as he shoots the zombies. I looked out some robot cartoon characters like Bender and the Iron Giant, and draw inspiration for the design of my robot.


I incorporate some objects relevant to the disco culture like the disco ball, spotlights, mix tape, boom box, and retro sunglasses in the design. I drew a lot of initial designs before I decided the two designs that I'd like to use for the final product. The highlight of the design is its retractable arm, which can be turned into laser gun.


I tried to explore more possibilities of what the robot can do, but I did not managed to continue the process because I don't have enough time to do it before the critic session. The resolved design has flexible joints. Although I'd like to take the challenge of making the squarish robot dance with some quirky dance moves, I prefer animating human-like figure because I can immediately use reference. I took the easy way out as this is a short project, in which I can't afford to spend too much time creating a well-developed character.


I look up for some zombie artworks online since zombie apocalypse has been a popular theme in comics, films and games, which gave me the gist of how zombie would look like if it does exists. A zombie has green coloured skin tone, white eyes, dislocated joints, and some parts of its body ripped apart.


I tried to draw many faces which I think will look like a zombie, while keeping in mind that I would like my designs to be wacky instead of scary. The designs that I like were highlighted in purple. As I will be drawing more than one zombie, I might have to exhaust all of the designs that I did during pre-production.


Some studies on zombie movements that I did while watching a play-through of Walking Dead the Game Season 2 on YouTube, Zombieland and World War Z.